


Every hunter must know how to field dress a deer.
The people behind MKC have broken down animals in every season, from 85-degree early bow season heat to below-freezing late rifle hunts. The fundamentals never change: work efficiently, keep the meat clean, and get the heat out of that carcass.
The moment an animal expires, the clock starts ticking. Temperature and time work together to determine whether you’ll end up with prime venison or ruined meat. To help you beat the clock, this guide covers knife selection, seasonal considerations, food safety, and more.
We follow the traditional gutting method here. The gutless method, where you skin and quarter the animal without opening the gut cavity, is another viable strategy, especially for larger game like elk and moose. Both have their place, but for most deer-hunting situations, we prefer gutting for its ability to cool the carcass quickly and to salvage organs like the heart and liver.

Why Field Dressing Matters
Understanding how to field dress a deer properly starts with knowing why it matters.
Field dressing removes internal organs to cool the carcass quickly and prevent bacterial growth. A deer’s body temperature hovers around 101–103 degrees Fahrenheit. Your goal is to drop that below 40 degrees as fast as conditions allow.
Leave those organs inside too long, especially in warm weather, and the meat starts to spoil. The guts are the main heat source in the body cavity, and they hold that warmth far longer than muscle tissue. If you open that animal up and pull the guts out, you’ve taken the single biggest step toward getting high-quality venison.
Field dressing makes deer easier to transport, too. You’re shedding a ton of weight by removing the entrails, which matters when you’re dragging a buck out of a ravine or hefting it into your truck bed.
Choosing the Right Field Dressing Knife
A sharp, reliable, fixed-blade knife is the most important tool you need when learning how to field dress a deer.
Folding knives work in a pinch, but they’re harder to clean thoroughly and can fail at the pivot point. A fixed blade gives you confidence that your knife won’t let you down halfway through the job.
When selecting a field dressing knife, focus on three factors: blade length, blade shape, and handle material.
Blade Length
For field dressing deer, a blade between 3 and 4 inches handles most tasks comfortably. This length gives you enough reach to open the body cavity and work around organs without the risk of puncturing the stomach or intestines.
Blades under 3 inches can work for precision cuts, but they also make the main incisions feel cramped. Blades over 5 inches add versatility for skinning and quartering, but they require more care when working in tight spaces.
Blade Shape
Drop point blades have the best all-around versatility. The gentle curve lends enough belly for skinning while the tip remains accessible for detailed work like caping around eyes and ears. This shape reduces the risk of accidentally puncturing organs, since the point sits below the blade’s spine.
Clip point blades excel at piercing and precision cutting. The thinner tip slips easily into tight spaces. Some hunters prefer this shape for making the initial incision near the pelvis.
Trailing point and skinner blades have a more pronounced belly curve designed to separate hide from meat. These work well as secondary knives if you plan to skin in the field.
Handle Material
G10 handles outperform natural materials in every practical way.
G10 won’t absorb blood, resists moisture and temperature extremes, and has excellent grip even when your hands are wet and slippery. Natural materials like wood and bone look traditional, but they require more maintenance and can harbor bacteria in pores.
Paracord-wrapped handles shed weight, have a decent grip, and add extra utility, making them a smart choice for backcountry hunters who count ounces. The downside is that they can absorb fluids and take longer to clean thoroughly.
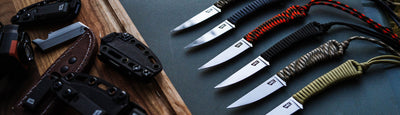
MKC Knife Recommendations for Field Dressing Deer
We designed our hunting knives with real-world conditions in mind, including field dressing deer. Here are our top picks for field dressing, each suited to different hunting styles and preferences.
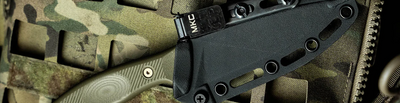
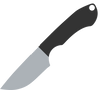
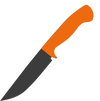
Blackfoot 2.0
The do-it-all choice.
The Blackfoot remains one of our most versatile designs. Its drop point shape handles gutting, caping, skinning, and deboning with equal confidence. The tip has enough of a point for delicate work around tear ducts, and the belly has plenty of curve for skinning.
Specs:
- Blade Length: 3 3/8″
- Overall Length: 7 1/2″
- Blade Thickness: 0.110″
- Weight: 3.6 oz
- Steel: MagnaCut stainless steel
- Handle: G10
At 3.6 ounces, it’s great for when you’re packing light, yet sturdy enough to cut through a pelvis or rib cage when you’re field dressing a deer. MagnaCut steel holds an edge longer than most stainless steels and resharpens easily in the field.
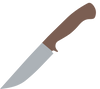
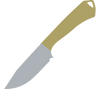
Whitetail Knife
Purpose-built for deer hunters.
We designed the Whitetail knife with deer hunters in mind. The 4″ blade lends a bit more reach for opening larger body cavities while still maintaining control.
Specs:
- Blade Length: 4″
- Overall Length: 8 5/8″
- Blade Thickness: 0.135″
- Weight: 4.49 oz
- Steel: MagnaCut stainless steel
- Handle: G10
The slightly thicker blade stock (0.135″) adds rigidity for splitting the pelvis or breastbone without flexing.
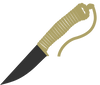
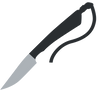
Speedgoat 2.0
The ultralight backcountry option.
When every ounce counts, the Speedgoat delivers. At just 1.7 ounces with a paracord handle, this knife packs anywhere without adding noticeable weight. The 3 3/4″ blade handles all field dressing tasks, and seven feet of usable paracord wraps the handle for emergencies.
Specs:
- Blade Length: 3 3/4″
- Overall Length: 7 7/8″
- Blade Thickness: 0.095″
- Weight: 1.7 oz
- Steel: MagnaCut stainless steel
- Handle: 550 paracord
Experienced hunters who want to travel light without sacrificing performance reach for the Speedgoat.
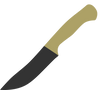
Stonewall Skinner
For hunters who prioritize skinning efficiency.
If you skin your deer in the field, the Stonewall Skinner’s pronounced belly curve covers ground faster than a standard drop point. The 4 5/8″ blade length accommodates larger animals and longer sweeping strokes.
Specs:
- Blade Length: 4 5/8″
- Overall Length: 9 1/4″
- Blade Thickness: 0.140″
- Weight: 5.53 oz
- Steel: MagnaCut stainless steel
- Handle: G10
The thicker blade (0.140″) adds durability for extended processing sessions where you’ll work on multiple deer.
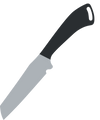
Packout Skinner
Designed with Cam Hanes for backcountry processing.
We partnered with Cam Hanes to create the Packout Skinner for hunters who process game miles from the truck. The compact 3″ blade handles detail work precisely, while the textured G10 handle ensures a secure grip through long sessions.
Specs:
- Blade Length: 3″
- Overall Length: 7″
- Blade Thickness: 0.110″
- Weight: 2.98 oz
- Steel: MagnaCut stainless steel
- Handle: G10
This knife pairs well with a larger blade when you’re breaking down deer quarters and removing backstraps in remote country.
Essential Tools and Supplies for Field Dressing Deer
Outside of your knife, pack these items to make field dressing a deer easier and cleaner.
Latex or nitrile gloves: Bring four or five pairs. They protect your hands from bacteria and keep them clean enough to eat a snack without contaminating your food. You’ll tear through at least one pair for each deer you field-dress, so carry extras.
Game bags: High-quality breathable game bags protect meat from dirt and flies while allowing airflow for cooling. Separate your deer quarters and prime cuts into different bags to keep them organized and prevent cross-contamination while field dressing, especially after a gut puncture.
Sharpening stone or field sharpener: Even the best steel dulls with use. An MKC field sharpener lets you restore your edge mid-job without stopping to switch knives.
Paracord or light rope: Useful for tying off, hanging meat overnight, or securing quarters to your pack frame.
Headlamp: More hunts end in darkness than most of us plan for. A headlamp frees both hands for field dressing while providing enough light to see what you’re cutting.
Electrical tape: Handy for securing your tag to the game bag or antlers.
Clean towels or rags: Use to wipe your hands and clean your knife blade between cuts.
Tarp or ground cloth: Keeps meat off the dirt when you’re laying out deer quarters or backstraps.
Cooler with ice (warm weather): If temperatures are above 40 degrees and you’re close to your vehicle, pack ice or frozen water bottles to place in the body cavity during transport.
Step-by-Step Instructions: How to Field Dress a Deer
Here’s how to field dress a deer efficiently and cleanly.
Step 1: Confirm the Deer Is Down
Approach the deer carefully and check for signs of life, such as a heartbeat, breathing, or blinking. Attempting to field dress a living deer puts you at serious risk of injury from hooves and antlers.
Step 2: Tag the Deer
Before making any cuts, attach your tag in accordance with your state’s regulations. Most states require tagging before any processing begins. Carry zip ties, wire, electrical tape, or string for this purpose.
Step 3: Position the Deer
Roll the deer onto its back. If you’re on a slope, position the head uphill for better drainage. Spread the hind legs apart to ensure easy access to the body cavity.
Use rocks or logs to prop the carcass in position if needed. Some hunters carry a small length of rope to tie one hind leg to a nearby tree or branch, keeping the work area open.
Step 4: Put on Your Gloves
Slip on latex or nitrile gloves before making any cuts. This protects you from bacteria and makes cleanup easier.
Step 5: Ring the Anus
This step prevents fecal contamination when you pull the intestines free later. Cut carefully around the anus, making a circular incision about 3/4 inch out from the opening and 3–4 inches deep. Work slowly to avoid nicking the bladder, which sits just forward of this area.
Once you’ve cut all the way around, the colon should be free to pull through from inside the body cavity. Some hunters tie it off with a short piece of string to prevent any spillage.
Step 6: If It’s a Buck, Remove the External Genitals
For male deer, carefully remove the external genitals before opening the belly. Cut around them and set them aside. Skip this if you’re in a state that requires evidence of sex to remain attached.
If it’s a doe, do not cut through the udder. Leave it intact to avoid making a mess if milk is present.
Step 7: Make the Initial Belly Incision
Hold your knife in your dominant hand with the blade facing up. Make a small incision just below the deer’s breastbone, only cutting through the skin and muscle layer.
Insert two fingers of your free hand into the incision, forming a “V” shape with your fingers on either side of the knife blade. These fingers ride along the blade’s tip as you cut, lifting the skin and muscle away from the organs underneath.
This “V-finger” technique is the key to avoiding punctured guts. Cut slowly down the belly’s midline toward the pelvis, letting your fingers guide the blade and protect the intestines.
Step 8: Open the Pelvis (Optional)
Some hunters split the pelvis to make removing the lower intestines easier. You can do this with a sturdy knife pressed firmly along the seam where the two halves of the pelvis meet, or with a bone saw.
This step isn’t required. Many experienced hunters simply reach in and pull the colon through without splitting the pelvis. If you’re having your deer mounted, consult your taxidermist, as some prefer the pelvis left intact.
Step 9: Cut the Diaphragm
The diaphragm is a thin wall of muscle that separates the chest cavity from the abdominal cavity. Cut it free from the rib cage on both sides, working carefully to avoid nicking the stomach or intestines below.
Step 10: Cut the Windpipe and Esophagus
Reach up into the chest cavity as far as you can. Grasp the windpipe and esophagus (they run parallel to each other in the neck) with one hand. Using your knife in the other hand, cut through both as far up the neck as possible.
Work quickly during this field-dressing step. The windpipe and esophagus can sour the meat if left attached too long, particularly in warm conditions.
Step 11: Remove the Entrails
With the entrails cut free, grab the windpipe firmly with both hands and pull downward. The heart, lungs, liver, stomach, and intestines should come out together as a single, connected mass.
If the anus was properly cut in Step 5, the colon will pull through the pelvis and come out with the rest. If it’s still attached, reach in and cut any remaining connective tissue.
Roll the deer onto its side to let the guts spill out. Place any organs you want to keep (heart and liver are excellent table fare) into a separate plastic bag.
Step 12: Drain and Cool the Cavity
Tip the deer so any accumulated blood drains from the body cavity. If you have access to a tree, hang the deer by its head or antlers for 15–20 minutes to finish draining. If no tree is available, prop the deer on a slope with the opening facing downhill.
Use a stick to prop the chest cavity open. This allows air to circulate and begins the cooling process.
Step 13: Wipe the Cavity Clean
Use clean towels to wipe the body cavity clean, removing any blood, hair, or debris. Only use water if stomach contents have spilled into the stomach. If you do rinse, dry the cavity thoroughly afterward to prevent bacterial growth.
Step 14: Transport or Continue Processing
Either transport the deer to a processor or continue with skinning and quartering yourself.
In hot weather or when you’re far from your campsite or vehicle, consider boning out any cuts you’d like to eat. Removing the bones decreases your harvest’s weight and cools the meat faster.
Venison Food Safety: Temperature and Timing Guidelines for Field Dressing Deer
Knowing how to field dress a deer is only part of the equation. Proper meat handling after gutting determines whether your venison ends up tender and delicious or spoiled and wasted.
Bacteria multiply rapidly between 40 and 140 degrees Fahrenheit, a range food scientists call the “danger zone.” Wild game sits right in the middle of this range when it expires. Your job is to drop the internal temperature below 40 degrees as quickly as possible.
Temperature Thresholds
Above 70 degrees: Field dress immediately. Consider skinning and quartering in the field to speed cooling. Pack cavity with ice if available. The meat can begin to spoil within hours.
Between 50 and 70 degrees: Field dress within 30 minutes to an hour. Prop the cavity open for airflow. Ice is helpful but not always critical if you can get the deer to refrigeration within a few hours.
Between 40 and 50 degrees: You have more flexibility. Proper airflow and shade will help maintain meat quality.
Below 40 degrees: Cold weather works in your favor. You can hang the deer overnight with the cavity propped open, allowing it to cool slowly before skinning in the morning.
Storage Timeframes
Refrigerator (40 degrees or below): Raw venison stays safe for three to five days.
Freezer (0 degrees or below): Properly wrapped venison maintains its quality for nine to 12 months. Liver, heart, and other organ meats stay good for about six months.
Room temperature (above 40 degrees): Never leave raw venison out for more than two hours. In temperatures above 90 degrees, that drops to one hour.
Aging: Controlled aging of meat at specific temperatures can give you a tender, flavorful product.
Cooking Temperatures
Venison is safe to eat once it reaches an internal temperature of 160 degrees Fahrenheit for ground meat or 145 degrees for whole cuts (followed by a three-minute rest). These temperatures destroy harmful bacteria and parasites.
Many hunters prefer their steaks cooked to medium or medium-rare. If you choose to cook below the recommended temperature, you’re accepting some level of risk from parasites like Toxoplasma gondii. Freezing at sub-zero temperatures for several days can reduce (but not eliminate) this risk.
Troubleshooting Common Field Dressing Problems
Even hunters who know how to field dress a deer occasionally make mistakes. Here’s how to handle the most common issues.
You Punctured the Stomach or Intestines
Don’t panic. It happens to everyone eventually. Remove the entrails carefully, minimizing contact between digestive contents and exposed meat.
Wipe the contaminated area immediately with clean, dry towels. Don’t use water, as it spreads bacteria. A 50/50 mixture of white vinegar and water can help neutralize bacteria if you have it available.
The meat isn’t ruined. Clean it as best you can and prioritize cooling. The affected areas may taste off, but most of the meat should be fine.
The Colon Won’t Pull Through
If your initial cut around the anus wasn’t deep enough, the colon will stay attached. Go back with your knife and cut a bit more around the deer’s pelvic area. Work carefully to avoid puncturing the intestines.
Some hunters find it easier to split the pelvis entirely rather than trying to pull the colon through intact.
You Can’t Reach the Windpipe
On larger deer, reaching far enough into the chest cavity to cut the windpipe can be difficult. If you can’t reach, cut through the breastbone (sternum) with your knife or a small saw. This opens the chest completely and gives you full access.
If you’re planning to mount the head, stop the chest incision below the brisket to preserve the cape.
Blood Pools Keep Accumulating
The deer’s body cavity will continue collecting blood for a while after field dressing. Tip the deer to drain, then prop it open and let gravity do its work. Rolling the deer from side to side helps blood flow toward the opening.
If you’re hanging the deer, choose head-up or hind-legs-up based on personal preference. Both work. The key is allowing drainage while the animal cools.
Hair Keeps Getting on the Meat
Hair makes meat taste gamey. Once you’ve started skinning, try to grab the hide’s underside rather than the hair side. Pull the skin away from the meat rather than dragging your knife through the hair.
For hair that’s already on the meat, a small handheld butane torch works well for burning it off before packaging. Alternatively, you can wipe the affected area with a damp cloth.
Your Knife Keeps Slipping
Wet, bloody handles get slippery fast. Wipe your hands and the handle frequently. G10 handles give better grip than smooth materials when wet. Consider wearing textured rubber gloves rather than smooth latex gloves for better knife control.
You’re Running Out of Daylight
If darkness is approaching, prioritize getting the guts out. Other tasks can wait.
A headlamp will help you finish the job, but nobody does their best work in the dark. Field dress, prop the cavity open, and continue processing in the morning if temperatures allow.
Frequently Asked Questions About How to Field Dress a Deer
These are the most common questions we hear from hunters learning how to field dress a deer for the first time.
How long after shooting a deer should I field dress it?
As fast as you can get to the animal safely. In warm weather (above 50 degrees), aim for within 30 minutes to an hour. In cold weather, you have more flexibility, but there’s never a good reason to delay unnecessarily.
Can I wait to gut a deer until I get home?
In cold weather (below 40 degrees) and with a short drive, some hunters transport ungutted deer successfully. We still don’t recommend it. The risk of spoilage and odd flavors increases when guts stay inside, even briefly.
Field dress in the field whenever possible.
Does the deer need to bleed out before I start?
No. A well-placed shot bleeds the animal internally through damage to major organs and blood vessels. Additional bleeding happens naturally during field dressing.
There’s no need to cut the throat or hang the deer to “bleed out” before gutting.
Should I wash out the body cavity with water?
Only if stomach contents spilled inside. Water introduces moisture that promotes bacterial growth. It’s better to wipe the cavity with clean, dry towels. If you must rinse, dry thoroughly afterward.
What do I do if I can’t find my deer until the next morning?
A deer left overnight with the guts inside will have some degree of spoilage, especially in warmer weather. Field dress the deer as soon as you find it and inspect the meat carefully. Areas in direct contact with the organs may be lost, but meat further from the body cavity is often salvageable.
Use your nose. If it smells off, it probably is.
Can I save the heart and liver?
Absolutely. The heart and liver are excellent for eating. Place them in a separate plastic bag, keep them cold, and cook within two to three days or freeze for later.
Do I need a bone saw?
Not for standard field dressing. A sturdy knife can split the pelvis and breastbone on most deer. A compact bone saw makes the job easier, especially on large bucks, but it’s not required gear.
What about chronic wasting disease (CWD)?
If you hunt in an area with documented CWD cases, wear gloves and avoid contact with brain tissue, spinal cord, and lymph nodes. Many states offer free CWD testing. Follow your state’s guidelines for disposal and testing.
by Josh Smith, Master Bladesmith and Founder of Montana Knife Company